Saturday, June 21, 2014

Wednesday, June 4, 2014
BEST WAYS TO ORGANIZE YOUR GARAGE THIS SUMMER
1. Use as much vertical and ceiling space as possible. This rule is particularly important if you're planning to keep your car here. Make sure you'll have room to pull the car in without running into — or over — anything.

2. Before reorganizing, try taking everything out of your garage. Looking at the space you have as a blank canvas can give you a better idea of what you're working with.
3. Decide what to keep, what to donate, and what to throw away. When you find yourself questioning a particular item, ask yourself:
-Do I love it?
-Do I need it?
-When was the last time I used this?
-If I donated it, could it be safely used by another person?
-Do I love it?
-Do I need it?
-When was the last time I used this?
-If I donated it, could it be safely used by another person?

4. Group like items together so they're easy to find.
5. Decide which area of the garage is going to be used for what purpose. Think carefully about what you want your garage to be used for, and the best possible way this space can be divided.
6. Label absolutely everything. If you’re tired of drawers and bins full of a hodgepodge of nails, screws, and bolts, take the time to sort each piece by type and label your storage containers and shelves accordingly. Tedious? Yes. Worth it? Yes.

Thursday, May 29, 2014
3 WAYS TO IMPROVE YOUR HOME FOR THE SUMMER...
1) Protect all your exterior wood: From furniture and decks to fences and siding, wood adds a touch of understated natural beauty to the exterior of your home. Wood also takes a lot of abuse from rain, snow, and sun. Keep them in good shape by staining or sealing them.

2) Replace windows that have broken seals or simply improve the quality of the glass. If you notice that your windows are "fogging," chances are the seal is broken and you need to do some replacing. You don't have to change the entire window, just the glass to avoid high costs. Replacing drafty single pane windows with insulated, double pane vinyl windows is a great way to save energy, reduce noise, and improve the look of your home.

3) Add insulation: Another way to reduce your utility bills, both summer and winter, is to make sure your attic has plenty of insulation.

Enjoy the summer!!!
Wednesday, May 28, 2014
Tuesday, October 2, 2012
Everything you wanted to know about flooring
Today more the ever, the popularity of hardwood floors in American homes has manufacturers developing new techniques to create hardwood flooring. Besides the common 3/4" solid oak flooring there are many new options for consumers to choose from. By gluing hardwood veneers together manufacturers are able create a hardwood floor that can be installed in places that the old 3/4" solid wood floors could not. In addition, the factory finishes that are used today are extremely tough and durable. So what hardwood floor is right for you? We'll help you determine which floors are best for your particular situation and we'll also help you avoid some common homeowner mistakes when buying hardwood flooring.
Wood Floor Construction
Solid – These floors are one complete piece of solid wood from top to bottom. They generally are 3/4" thick, however new technology in milling is allowing for a 5/16" thickness as well. The most commonly recognized width is 2 1/4" but also comes in sizes from 1 1/2" strips to 7" planks. Lengths will be random from 12" – 84".
All solid products react to the presents of moisture. In the winter heating months, moisture leaves the wood causing the floor to contract or leave gaps between each board. In the summer months when humidity enters the wood, it will cause the wood to expand and if there is too much moisture it can cause it to cup.
Solid strip or plank floors can only be installed with the Nail Down procedure on a wooden subfloor.
Engineered – Refers to products that have 2,3, or 5 layers of wood laminated together to become one board. These products will arrange in thickness from 1/4" to 9/16" and widths from 2 ¼" to 7". Lengths will be random from 12" – 60".
Engineered floors have layers of wood that have a cross-graining lamination process resulting in a product that is dimensionally stable and not affected by moisture as greatly as solids. With cross-graining the plies, engineered floors become very stable so they do not expand and contact like solid products. Engineered floors can be installed on any grade level of the home; below grade, on grade or above grade. Installation options are Nail Down, Staple Down, Glue Down, or Floating.
Longstrip – Is constructed the same as Engineered products, but carries its own description because these products are "Long" planks – approximately 84" in length – and have individual sliced cut slats that are glued together to make up the face of each plank. Longstrip boards can have as few as 17 slats per board or as many as 35 slats per board.
Longstrip products are designed for a Floating installation, but certain manufacturers also recommend Glue Down, and or Staple Down.
Parquet – Comes in many unique patterns, but generally thought of as a 12"x12" square. Six 1" fillets are assembled into 6"x6" squares and then four of these are quarter-turned to make the 12"x12" square. Patterned parquets are very elegant and can add a special feature to your wood floor.
Parquets are a Glue Down installation either on grade or above grade.
A big difference between solid oak floors and engineered oak floors is how they are cut from the tree. Solid oak planks are sawn from the tree trunk, which cuts right through the tree's circular growth rings. While the engineered planks begin by cutting the wood veneers with sharp knives as the tree is spun in a circle. The wood veneers are then dried and laminated together to make wood flooring planks.
Wood always wants to grow in a certain direction. In solid wood planks the boards will always grow across the width of the planks, not the lengths. By taking each ply in an engineered plank and by changing the direction of wood graining for each ply you can drastically reduce the expansion and contraction problem. This is called cross-ply construction. To help understand this, think of it as one ply will be growing to the left, while the other ply will be growing to the right. Thus the plies counteract each other and prohibit expanding, or contracting. This is why it's not necessary to leave an expansion gap around the perimeter of a room when installing most engineered floors.
Hardwood floors come in either a beveled edge or a square edge. Today, most hardwood floor manufacturers are calling their beveled edge "eased edge" because the tapered edge is dramatically reduced from the old deeply grooved edges. The eased edge does serve a purpose. First, the manufacturer can produce these planks faster and thus lower the price per square foot without sacrificing the quality of the hardwood. Second, the eased edge is more forgiving over slightly irregular subfloors. If you are concerned with variations in plank heights than the eased edge is the style to choose.
Unfinished solid oak floors come in several different qualities. These qualities are clear, select and better, #1 common, and #2 common. The clear has no visual blemishes or knots and is extremely expensive. The select and better quality has some small knots and very little dark graining, while the #1 common and #2 common have more knots and more dark graining. When buying an unfinished solid oak floor make sure you know what quality you are buying.
Wood Finishes
UV-cured – Factory finishes that are cured with Ultra Violet lights versus heat.
Polyurethane – A clear, tough and durable finish that is applied as a wear layer.
Acrylic-urethane – A slightly different chemical make up than Polyurethane with the same benefits.
Ceramic – Advanced technology that allows the use of ceramics to increase the abrasion resistance of the wear layer.
Aluminum Oxide – Added to the urethane finish for increased abrasion resistance of the wear layer.
Acrylic Impregnated – Acrylic monomers are injected into the cell structure of the wood to give increased hardness and then finished with a wear layer over the wood.
Although the old method of stain and coat is still used on unfinished wood floors, the factory pre-finished wood floors have grown tremendously. Today the hardwood flooring manufacturers are using several coats of ultra-violet(UV) cured urethane to protect their wood floors. The UV cured urethanes can only be properly cured in the presence of UV light, which can only be done in a manufacturing facility. These UV cured urethanes create a tough, scratch resistant wear layer and help prevent moisture from penetrating the wood's surface. This does not mean you should wash your floor with a mop, but it does mean these floors won't watermark like the old waxed hardwood floors and the UV cure urethanes do make it easier to maintain the like new appearance than the old waxed hardwood floors.
Most factory finished hardwood floors have several coats of finish applied to the wood's surface. For example, on some flooring 7 coats of UV cured urethane is applied. This would be extremely difficult for someone to duplicate on a job site finish, not to mention how many days it would take. This is one of the main reasons why many flooring mechanics, retailers, as well as, builders are pushing pre-finished hardwood flooring. Instead of taking several days to install and finish a new hardwood floor, a pre-finished hardwood floor is generally done in one day.
Wood Installation Methods
Nail Down – Typically used with the 3/4" solid products, however there are adapters available for thinner products as well. 2" nailing cleats are used with a wood flooring nailer and mallet to attach the flooring to the subfloor. Solid Strip floors or Plank floors can only be installed on wooden subfloors on grade or above grade. The National Oak Flooring Manufacturers Association has complete installation instructions available on their web site.
Staple Down – Staples are used versus nailing cleats to attach the wood flooring to the subfloor. A pneumatic gun is used to drive the staple into the wood flooring and subfloor. This procedure is easier than the nail down for do-it-yourself installations. Not all wood flooring manufacturers recommend the same staple gun. Read the manufacturers installation manual to assure you have the right staple gun and right size staples.
Glue Down – Mastic or adhesive is spread on with a trowel to adhere the wood flooring to the subfloor.
Engineered wood floors and parquets can be glued down. Solid strip floors and solid plank floors can only be nailed or stapled. There are many types of adhesives on the market, please use the manufacturers recommended adhesive when installing their flooring. Not using the manufacturers recommended adhesive could void any warranties you may.
Floating – Floating refers that these floors are not mechanically fastened to the subfloor. There is a thin pad that is placed between the wood flooring and the subfloor. A wood glue is applied in the tongue and groove of each plank to hold the planks together. The padding protects against moisture, reduces noise transmission, softer under foot, and provides for some additional "R" value. Some engineered floors and all Longstrip floors can be floated. This is a very fast, easy and clean method of installation. Please consult the manufacturer installation instructions to see if your flooring can be floated.
At Homecorp, we do all kind of wood flooring installation in the Dallas and Metroplex. Call us for your new home construction or remodel.
www.homecorptx.com

Thursday, August 30, 2012
Swimming Pool Safety and Maintenance
With Labor Day around the corner, Homecorp would like to provide you with some swimming pool safety and maintenance tips. It is critical that you protect your friends and family as you beat the heat this holiday!
1. Maintain secure fencing and a locked entrance around the pool and deck area to prevent access when adequate supervision is not available.
2. Make sure there is adequate lifesaving equipment in the pool area, including life preservers and a rescue hook.
3. Keep chemicals safely stored away from the pool area. Follow all storage and usage instructions recommended by the manufacturer.
4. Never leave a child unattended in the water or pool area.
5. Inspect the liner periodically. Rips and tears can appear undetected at the top of the lining.
6. Check for signs of wear and tear in areas where pipes or other items may have penetrated the liner (e.g., skimmers, hoses, etc.).
7. For above ground pools, check metal supports for rust or deterioration. These may indicate areas where the pool could rupture or a person could be injured.
8. Check the deck for safety hazards (e.g., protruding nails, loose boards, etc.).
9. Keep your pool maintained and seasonably prepped. Be sure to lower the water level and keep the pool covered in the winter months.
10. Install an audible pool alarm to alert you if someone falls into the pool while it is unattended.
Enjoy the weekend!!!! We're here for all your pool needs!
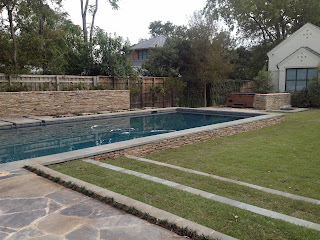
With Labor Day around the corner, Homecorp would like to provide you with some swimming pool safety and maintenance tips. It is critical that you protect your friends and family as you beat the heat this holiday!
1. Maintain secure fencing and a locked entrance around the pool and deck area to prevent access when adequate supervision is not available.
2. Make sure there is adequate lifesaving equipment in the pool area, including life preservers and a rescue hook.
3. Keep chemicals safely stored away from the pool area. Follow all storage and usage instructions recommended by the manufacturer.
4. Never leave a child unattended in the water or pool area.
5. Inspect the liner periodically. Rips and tears can appear undetected at the top of the lining.
6. Check for signs of wear and tear in areas where pipes or other items may have penetrated the liner (e.g., skimmers, hoses, etc.).
7. For above ground pools, check metal supports for rust or deterioration. These may indicate areas where the pool could rupture or a person could be injured.
8. Check the deck for safety hazards (e.g., protruding nails, loose boards, etc.).
9. Keep your pool maintained and seasonably prepped. Be sure to lower the water level and keep the pool covered in the winter months.
10. Install an audible pool alarm to alert you if someone falls into the pool while it is unattended.
Enjoy the weekend!!!! We're here for all your pool needs!
www.facebook.com/homecorptx
www.homecorptx.com

Tuesday, September 1, 2009
Horror Stories
How many times have we heard the comments, "my builder was a disaster." "I am never remodeling or building again." "All contractors are rip-offs."
In this industry, it is actually very common to experience misunderstanding as well as budget "malfuntcions." However, there is no need for these to ocurr. The truth of the matter is that these type of misunderstandings can happen only under three circumstances. Either your contractor is actually a crook, you did not put everything in writing, or there was no follow up on the client's and builder's part to continually be informed of progress and expenses.
Here are a few tips that will help when you begin your next project:
On the actual contractor:
1) Get references. If all references come from the builder, call them, but also contact the local construction commission or remodeler's association and find out if there are any outstanding claims for the company.
2) Try to gage the builder and look for the following signs during the interview. Does he tell you he call deliver all you ask for with no type of disclaimers. He seems so easy to work with, he is willing to do anything you want, and never says it will cost more, even when you start adding items to the project. He tells you that you cannot contact his trades directly.
3) He cannot give you vendor referrals, such as a lumber company or plumbing company. Every referral he has is an independent "guy."
Keeping it all in writing:
1) Your contract. It is very important to have an attorney look it over. The amount of money you will save if all your points are covered is worth the small fee an attorney will charge.
2) Change orders. Keep track of every change you make, as well as those the builder recommends, etc. Even if you keep it in an email, you will have something to refer back to.
3) Lien waivers. When you issue a payment to your builder, it is not out of line to request that after paying all trades, the builder bring you copies of the lien waivers signed by all vendors working on your house. In case some disguntled trade comes knocking, you will have proof that he has been paid.
4) Keep track of deliveries, quality of items, etc. When you discuss with the builder what material will be used, make sure that it matches what was delivered.
Keeping Track:
1) You should have weekly or monthly meetings with your builder to see where you are in the construction process, both financially and time wise. There may be issues you are not aware of, or expectations the builder is not aware of. This is the time to go over every issue you have before it grows into a bigger problem.
If you have a party planned at your home, don't expect the builder to know about it unless you've told him how important it is to complete the work beforehand.
2) Make sure the builder knows immediately if you are unhappy with the way something looks. It is easier for the builder to tackle issues when the trades are on site, or before they have received final payment.
3) Keep all paperwork you are sent. When warranty time comes, you will want to have as much information as you can available to you.
Important rules to keep in mind:
1) Never pay for items that have not been completed unless it is a deposit (In this case, we usually recommend you make a check to the builder and the trade together, so there are no misunderstandings).
2) Know that just because you've paid your contractor, it does not mean he has paid his subs. Find out if your money is properly distributed so you have no hold ups or surprises.
Most builders will work with these rules because it benefits you both. If you find one that has an issue with them, RUN!
In this industry, it is actually very common to experience misunderstanding as well as budget "malfuntcions." However, there is no need for these to ocurr. The truth of the matter is that these type of misunderstandings can happen only under three circumstances. Either your contractor is actually a crook, you did not put everything in writing, or there was no follow up on the client's and builder's part to continually be informed of progress and expenses.
Here are a few tips that will help when you begin your next project:
On the actual contractor:
1) Get references. If all references come from the builder, call them, but also contact the local construction commission or remodeler's association and find out if there are any outstanding claims for the company.
2) Try to gage the builder and look for the following signs during the interview. Does he tell you he call deliver all you ask for with no type of disclaimers. He seems so easy to work with, he is willing to do anything you want, and never says it will cost more, even when you start adding items to the project. He tells you that you cannot contact his trades directly.
3) He cannot give you vendor referrals, such as a lumber company or plumbing company. Every referral he has is an independent "guy."
Keeping it all in writing:
1) Your contract. It is very important to have an attorney look it over. The amount of money you will save if all your points are covered is worth the small fee an attorney will charge.
2) Change orders. Keep track of every change you make, as well as those the builder recommends, etc. Even if you keep it in an email, you will have something to refer back to.
3) Lien waivers. When you issue a payment to your builder, it is not out of line to request that after paying all trades, the builder bring you copies of the lien waivers signed by all vendors working on your house. In case some disguntled trade comes knocking, you will have proof that he has been paid.
4) Keep track of deliveries, quality of items, etc. When you discuss with the builder what material will be used, make sure that it matches what was delivered.
Keeping Track:
1) You should have weekly or monthly meetings with your builder to see where you are in the construction process, both financially and time wise. There may be issues you are not aware of, or expectations the builder is not aware of. This is the time to go over every issue you have before it grows into a bigger problem.
If you have a party planned at your home, don't expect the builder to know about it unless you've told him how important it is to complete the work beforehand.
2) Make sure the builder knows immediately if you are unhappy with the way something looks. It is easier for the builder to tackle issues when the trades are on site, or before they have received final payment.
3) Keep all paperwork you are sent. When warranty time comes, you will want to have as much information as you can available to you.
Important rules to keep in mind:
1) Never pay for items that have not been completed unless it is a deposit (In this case, we usually recommend you make a check to the builder and the trade together, so there are no misunderstandings).
2) Know that just because you've paid your contractor, it does not mean he has paid his subs. Find out if your money is properly distributed so you have no hold ups or surprises.
Most builders will work with these rules because it benefits you both. If you find one that has an issue with them, RUN!
Subscribe to:
Posts (Atom)